
Honeywell T6 Pro Install Manual: Comprehensive Plan
This comprehensive manual details the Honeywell T6 Pro thermostat installation process. It covers everything from initial safety checks and required tools,
to detailed wiring diagrams and Wi-Fi setup. Explore advanced features, troubleshooting, and smart home integration for optimal performance.
The Honeywell T6 Pro Smart Thermostat represents a significant advancement in home climate control. This programmable thermostat offers a blend of functionality, user-friendliness, and smart home integration, making it a popular choice for both new installations and upgrades. It’s designed to provide precise temperature management, enhancing comfort and potentially reducing energy consumption.
Unlike traditional thermostats, the T6 Pro boasts a vibrant touchscreen display and intuitive interface. It supports various heating and cooling systems, including conventional, heat pump, and radiant systems. Furthermore, the thermostat’s compatibility with platforms like Alexa and Google Assistant allows for voice control and seamless integration into existing smart home ecosystems.
This installation manual provides a step-by-step guide to ensure a smooth and successful setup. Whether you’re a seasoned DIY enthusiast or a first-time installer, these instructions will walk you through each stage, from safety precautions and tool requirements to wiring, configuration, and troubleshooting. Proper installation is crucial for optimal performance and to unlock the full potential of your Honeywell T6 Pro.
Understanding the T6 Pro System Components
The Honeywell T6 Pro system comprises several key components working in harmony to deliver efficient climate control. The primary element is the thermostat itself, featuring a detachable touchscreen display and a mounting base that connects to your HVAC system’s wiring.
The thermostat base serves as the central hub for electrical connections. It’s crucial to correctly identify and connect the wires corresponding to your specific heating and cooling setup. A C-wire (common wire) is often required for consistent power, though alternative solutions exist for systems lacking one.
The detachable display unit communicates wirelessly with the base, offering a convenient and aesthetically pleasing interface. It provides real-time temperature readings, scheduling options, and access to smart features via the Honeywell Home app. Understanding the function of each component is vital for a successful installation.
Additionally, the system relies on a stable Wi-Fi connection for remote access, software updates, and integration with smart home platforms. Familiarizing yourself with these components before beginning the installation process will streamline the setup and ensure optimal performance.
Safety Precautions Before Installation
Prior to commencing the Honeywell T6 Pro thermostat installation, strict adherence to safety precautions is paramount. Always disconnect power to your HVAC system at the breaker box to prevent electrical shock. Confirm the power is off using a non-contact voltage tester before handling any wiring.
Exercise caution when working with wiring, as incorrect connections can damage the thermostat or your HVAC equipment. If you are uncomfortable working with electrical wiring, consult a qualified HVAC technician. Never attempt installation during inclement weather or in damp conditions.
Wear appropriate safety glasses to protect your eyes from dust and debris. Keep children and pets away from the work area to prevent accidental injury. Properly dispose of old thermostat components and packaging materials.
Review all instructions thoroughly before beginning the installation process. Familiarize yourself with the wiring diagram specific to your HVAC system. Ignoring these safety measures could result in personal injury or damage to your equipment.
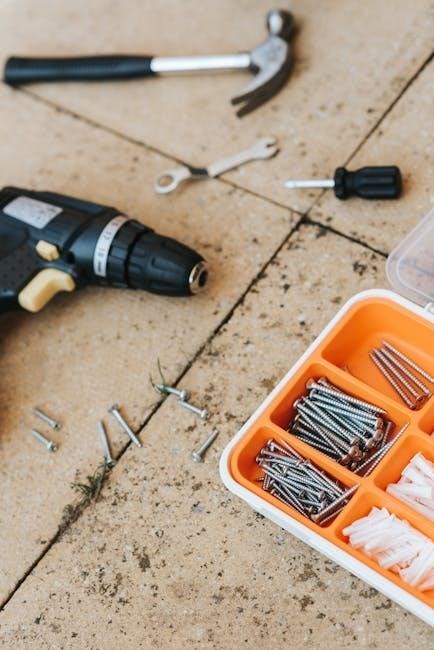
Tools Required for Installation
Successful Honeywell T6 Pro thermostat installation necessitates a specific set of tools. A Phillips head screwdriver is essential for mounting the thermostat base and securing wiring connections. A flathead screwdriver may be needed for certain terminal screws.
A non-contact voltage tester is crucial for verifying power is disconnected before handling wires, ensuring safety. Wire strippers are required to expose the correct length of wire for secure connections. Pliers can assist with bending and manipulating wires.
A level is vital for ensuring the thermostat base is mounted straight, providing accurate temperature readings. A drill with appropriate drill bits may be necessary for creating mounting holes in the wall. Masking tape can temporarily hold the base in place during marking.
A digital multimeter is helpful for testing voltage and continuity, though not strictly required. Finally, a smartphone or tablet with Wi-Fi access is needed for the final setup and registration process via the Honeywell Home app.
Wiring Diagram Overview
Understanding the wiring diagram is paramount for a successful Honeywell T6 Pro installation. The diagram illustrates the connection points for various system components – heating, cooling, and common (C) wire. Typically, ‘R’ designates the 24V power source, while ‘W’ controls heating, and ‘Y’ manages cooling.
‘G’ activates the fan, and the ‘C’ wire provides a constant 24V return path, often essential for thermostat operation. Heat pump systems will include additional wiring for reversing valves and auxiliary heat. Carefully identify each wire before disconnecting it from the old thermostat, labeling them if necessary.
The T6 Pro supports various system configurations, so consult the specific diagram corresponding to your setup. Incorrect wiring can damage the thermostat or your HVAC system. Pay close attention to wire colors, though these can vary by installer.
Refer to the detailed diagram included in the installation packet and the Honeywell Home app for visual guidance. If unsure, consult a qualified HVAC technician to avoid potential issues.
C-Wire Requirement and Alternatives
The Honeywell T6 Pro thermostat often requires a ‘C’ wire (common wire) for consistent power. This wire provides a return path for the 24V system, preventing power stealing from other components. Without a C-wire, the thermostat may experience intermittent issues like dropped Wi-Fi connections or erratic operation.

If a C-wire isn’t present at your thermostat location, several alternatives exist. A C-wire adapter can be installed at the furnace or air handler, effectively creating a common wire from existing wires. These adapters typically utilize the unused fan wire, but require careful installation.
Another option is to run a new thermostat cable with a dedicated C-wire. This is the most reliable solution but involves more extensive work. Some HVAC systems may already have an unused wire within the existing cable, which can be repurposed as the C-wire.
Always consult the T6 Pro’s documentation and consider professional assistance if you’re unsure about C-wire alternatives. Incorrectly implementing these solutions can damage your HVAC system.

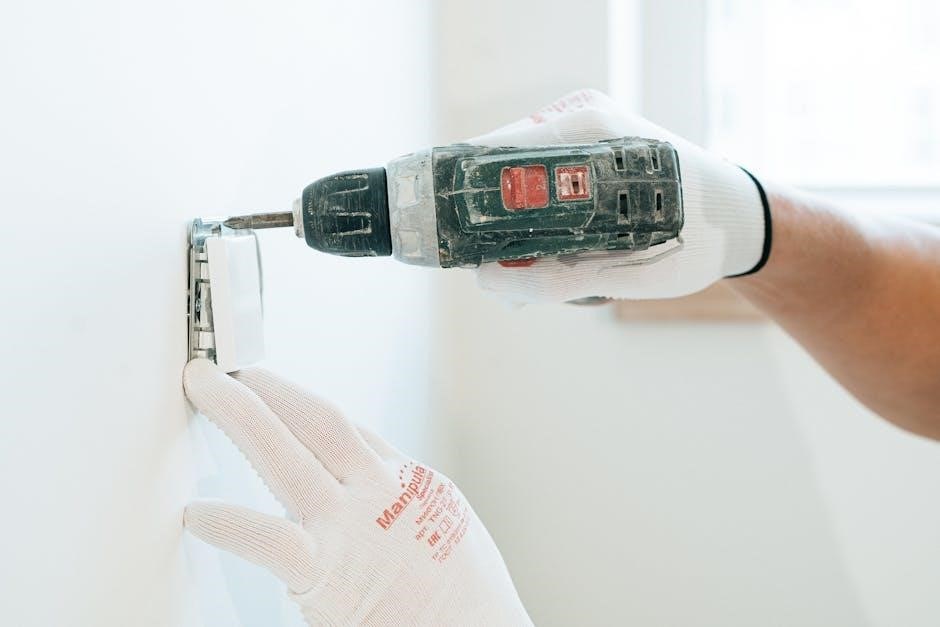
Mounting the T6 Pro Thermostat Base
Before mounting the Honeywell T6 Pro base, ensure the HVAC system’s power is completely switched off at the breaker box. This is a crucial safety precaution. Remove the existing thermostat’s baseplate, carefully noting the wire connections for later reference – a photograph is highly recommended.
The T6 Pro baseplate offers mounting holes compatible with standard thermostat mounting configurations. Use the provided screws and wall anchors if necessary, ensuring a secure and level installation. For uneven surfaces, consider using a thin shim to achieve a flush fit.
Position the baseplate so the wires will easily reach the terminals. Avoid forcing the wires into tight spaces, as this can cause damage. The baseplate should sit firmly against the wall without any wobble.
Double-check the level before fully tightening the screws. A slightly tilted base can affect the display’s appearance and potentially the thermostat’s operation. Ensure the base is securely fastened before proceeding to the wiring stage.
Connecting the Wiring to the Base
With the baseplate securely mounted, carefully connect the wires to the corresponding terminals. Refer to the wiring diagram and the notes/photograph taken during the removal of the old thermostat. Ensure each wire is firmly inserted into the correct terminal – a loose connection can cause system malfunctions.
Typically, wires are labeled with letters like R, C, W, Y, and G. Match these labels to the corresponding terminals on the T6 Pro base. If you are unsure about a wire’s function, consult a qualified HVAC technician. Avoid stripping the wires excessively; expose only enough conductor to make a secure connection.
Gently tug on each wire after insertion to confirm it’s securely held in place; Be particularly careful with the C-wire (common wire), as it’s essential for powering the thermostat. If a C-wire isn’t present, explore the alternative options detailed in the C-wire section of this manual.
Double-check all connections against the wiring diagram before proceeding. Incorrect wiring can damage the thermostat or the HVAC system. Once verified, proceed to attaching the thermostat display.
Attaching the Thermostat Display
With the wiring securely connected to the baseplate, carefully align the thermostat display with the base. Gently press the display onto the base until it clicks into place. Ensure it’s firmly seated and flush against the wall. Do not force the display; if it doesn’t align easily, double-check the wiring connections and baseplate mounting.
The display connects to the base via a series of electrical contacts. These contacts establish the communication link between the display and the HVAC system. Once attached, verify that the display is securely held in place and doesn’t wobble. A loose connection can cause intermittent operation or display issues.
Before powering on the system, visually inspect the display for any signs of damage. If you notice any cracks or defects, do not proceed and contact Honeywell support. Properly attaching the display is crucial for both functionality and aesthetics.
Now that the display is attached, you are ready to proceed to the next step: powering on the thermostat and initiating the initial setup process;
Powering On and Initial Setup
After securely attaching the thermostat display, restore power to the HVAC system at the breaker. The T6 Pro display should illuminate, initiating the startup sequence. Allow a few moments for the thermostat to boot up and perform its self-checks. The initial setup wizard will then guide you through the configuration process.
The first step typically involves selecting your preferred language and date/time settings. Next, the thermostat will prompt you to identify your system type – heat, cool, or heat pump. Accurate system identification is critical for proper operation. Follow the on-screen instructions carefully.

The thermostat may also ask for your zip code to access local weather information. This data is used for smart features like weather-based scheduling. Throughout the setup process, pay close attention to any prompts or warnings displayed on the screen.
Completing the initial setup ensures the T6 Pro is correctly configured for your specific HVAC system and preferences. Proceed to the Wi-Fi connection step to unlock remote access and advanced features.
Wi-Fi Connection and Registration
To unlock the full potential of your T6 Pro, connecting to Wi-Fi is essential. From the thermostat display, navigate to the network settings menu. The thermostat will scan for available Wi-Fi networks in your area. Select your home network from the list.
Enter your Wi-Fi password carefully, ensuring correct capitalization and characters. The thermostat will attempt to connect to your network. A successful connection will be indicated by a Wi-Fi symbol on the display. If the connection fails, double-check your password and network settings.
Once connected to Wi-Fi, you’ll need to register your thermostat with the Honeywell Home app. Download the app from the App Store or Google Play and create an account. Follow the in-app instructions to add your T6 Pro thermostat.
Registration enables remote control, scheduling, geofencing, and access to advanced features. Ensure your thermostat is linked to your Honeywell Home account for seamless integration and optimal performance.
Setting System Type (Heat, Cool, Heat Pump)
Accurate system type configuration is crucial for proper T6 Pro operation. Access the settings menu on your thermostat and locate the “System Type” option. You’ll be presented with choices: Heat, Cool, Heat Pump, and potentially others depending on your specific setup.
Select “Heat” if you have a conventional furnace providing warmth. Choose “Cool” if you have a central air conditioning system for cooling. If you have a heat pump, which provides both heating and cooling, select the “Heat Pump” option. Heat pumps require specific settings for optimal efficiency.
Incorrect system type selection can lead to inefficient operation, inaccurate temperature readings, and potential system damage. If you’re unsure about your system type, consult your HVAC professional. The Honeywell Home app may also offer guidance based on your wiring configuration.
After selecting the correct system type, the thermostat will adjust its control algorithms accordingly. Verify the settings by testing both heating and cooling functions to ensure proper operation.
Configuring Fan Control

The Honeywell T6 Pro offers flexible fan control options to enhance comfort and air circulation. Access the “Fan” settings within the thermostat’s menu. You’ll typically find three primary settings: Auto, On, and Circulate.
“Auto” mode is the most common setting, where the fan operates only during heating or cooling cycles. Selecting “On” keeps the fan running continuously, providing constant air circulation. This can improve air quality and temperature consistency, but increases energy consumption.
The “Circulate” setting runs the fan intermittently, even when heating or cooling isn’t active. This helps to distribute air throughout your home and prevent temperature stratification. Adjust the circulation frequency to your preference.
Consider your home’s layout and your comfort preferences when choosing a fan control setting. Experiment with different options to find what works best for you. The Honeywell Home app allows remote control and scheduling of fan settings.
Programming Schedules
The Honeywell T6 Pro excels in energy efficiency through programmable schedules. Access the scheduling feature via the thermostat’s menu or the Honeywell Home app. You can create customized schedules for each day of the week, tailoring temperatures to your lifestyle.
Typically, you’ll define multiple periods per day: Wake, Leave, Return, and Sleep. For each period, set a desired temperature for both heating and cooling. The thermostat automatically adjusts based on your programmed schedule.
Consider your daily routines when creating schedules. Lower temperatures while you’re away or asleep to save energy. Utilize the “Hold” function for temporary overrides without disrupting your schedule. The app allows easy schedule adjustments from anywhere.
Explore advanced scheduling options like Smart Response, which learns your home’s heating and cooling characteristics. Regularly review and adjust your schedules to optimize comfort and energy savings. Proper scheduling maximizes the T6 Pro’s benefits.
Geofencing Feature Setup
The Honeywell T6 Pro’s geofencing feature offers convenient, automated temperature control based on your location. This requires the Honeywell Home app and location permissions enabled on your smartphone. Within the app, navigate to the geofencing settings and define a virtual “fence” around your home.
Specify a radius for the geofence – the area within which the thermostat responds to your presence. Configure the thermostat’s behavior when you enter or exit the geofence. For example, set it to automatically switch to “Away” mode when you leave and “Home” mode upon your return;
Ensure accurate location services on your phone for reliable geofencing. Multiple users can be added to the geofence, allowing for shared control. Adjust sensitivity settings to prevent false triggers. Geofencing provides hands-free comfort and energy savings.
Regularly test the geofencing functionality to confirm it’s working as expected; Consider battery optimization settings on your phone, as they can sometimes interfere with location tracking. Proper setup maximizes the convenience of this smart feature.
Remote Access via Honeywell Home App
The Honeywell Home app is central to remotely controlling your T6 Pro thermostat. After successful Wi-Fi connection and account registration, download the app from your device’s app store (iOS or Android). Log in using the credentials created during thermostat registration.
The app provides a user-friendly interface to view current temperature, adjust setpoints, and change system modes (Heat, Cool, Auto, Off). You can create and manage schedules, overriding them as needed for temporary adjustments. Monitor energy usage reports to track savings and optimize settings.
Remote access allows control from anywhere with an internet connection. Receive alerts and notifications for temperature extremes or system malfunctions. The app supports multiple thermostats, ideal for homes with zoned heating and cooling. Ensure your app is updated for the latest features and security enhancements.
Troubleshooting connectivity issues often involves verifying your home Wi-Fi network and thermostat’s connection. Explore the app’s settings for customization options and advanced features. Remote access offers convenience and peace of mind.
Troubleshooting Common Installation Issues
During T6 Pro installation, several issues may arise. A common problem is incorrect wiring; double-check the wiring diagram and ensure each wire is securely connected to the correct terminal. Verify the C-wire connection, as its absence often causes operational problems. If the thermostat doesn’t power on, confirm the breaker is on and the wiring is correct.
Wi-Fi connectivity issues are frequent. Ensure your Wi-Fi network is functioning correctly and the password entered is accurate. Check the thermostat’s signal strength and consider relocating the router if necessary. App pairing failures can be resolved by restarting both the thermostat and your mobile device.
Incorrect system type settings (Heat, Cool, Heat Pump) can lead to improper operation. Review your HVAC system’s documentation to confirm the correct setting. Error codes displayed on the thermostat provide valuable clues; consult the error code section of this manual for specific solutions. A reset may resolve persistent issues.
Always prioritize safety; if unsure, consult a qualified HVAC technician.
Understanding Error Codes
The Honeywell T6 Pro thermostat utilizes error codes to diagnose system issues. These codes appear on the display, providing valuable information for troubleshooting. A “C Wire Missing” error indicates a lack of 24V common power, requiring a C-wire installation or compatible power adapter. “E1” typically signals a communication failure between the thermostat and the HVAC system – check wiring connections.
“E2” often points to a sensor issue, potentially a faulty temperature sensor. “E3” suggests a problem with the heating or cooling system itself, like a locked-out furnace. “Low Battery” indicates the need for battery replacement, even with a C-wire connected. “Wi-Fi Error” signifies a connection problem, requiring network verification.
Refer to the complete error code list in the appendix of this manual for a comprehensive explanation of each code and suggested solutions. Some errors may require professional HVAC assistance. Document the error code before contacting support for faster assistance. Regularly checking for error codes can prevent minor issues from escalating.

Ignoring error codes can lead to system damage or inefficient operation.
Resetting the T6 Pro Thermostat
Resetting your Honeywell T6 Pro thermostat can resolve various software glitches and restore factory settings. A soft reset, or restart, simply cycles the power to the thermostat. This is achieved by removing the thermostat faceplate for approximately 30 seconds, then reattaching it; This resolves minor operational issues without erasing personalized settings.
For more significant problems, a factory reset is necessary. This erases all custom programming, Wi-Fi connections, and schedules, returning the thermostat to its original state. To perform a factory reset, navigate to the settings menu on the thermostat display. Select “Reset” or “Factory Reset” and confirm your choice.
Be aware that a factory reset requires re-configuring all settings, including your system type, schedules, and Wi-Fi connection. Before performing a factory reset, consider documenting your current settings for easier re-entry. If the thermostat becomes unresponsive, a prolonged power disconnection (removing the faceplate for several minutes) may be required before resetting.
Resetting should be considered as a last resort for troubleshooting.
Updating Firmware
Maintaining up-to-date firmware is crucial for optimal Honeywell T6 Pro performance and security. Firmware updates deliver bug fixes, enhance compatibility with Honeywell Home app features, and introduce new functionalities. The T6 Pro typically receives updates over-the-air (OTA) via your home’s Wi-Fi connection, provided the thermostat is connected to the Honeywell Home system.
To check for updates, navigate to the settings menu on the thermostat display or within the Honeywell Home mobile app. Select “About” or “System” and then “Check for Updates.” The thermostat will automatically search for available firmware versions. If an update is found, follow the on-screen prompts to download and install it.
During the update process, avoid interrupting power to the thermostat. The update may take several minutes to complete, and the thermostat may temporarily restart. Ensure a stable Wi-Fi connection throughout the process. Regularly checking for updates ensures your T6 Pro benefits from the latest improvements and security patches.
Firmware updates are generally automatic, but manual checks are recommended.
Advanced Settings and Customization
The Honeywell T6 Pro offers a range of advanced settings for personalized climate control. Beyond basic scheduling, users can fine-tune system behavior to optimize comfort and energy efficiency. Explore settings like “Smart Recovery” which learns how long it takes to reach desired temperatures, pre-heating or cooling proactively.
Customize fan settings beyond “Auto” to include continuous fan operation for improved air circulation. Adjust temperature offsets to calibrate the thermostat’s readings if discrepancies exist. Configure swing settings to control the direction of airflow. Filter change reminders can be set to ensure optimal air quality.
Advanced users can access equipment settings to modify parameters specific to their HVAC system, such as cycle rates and minimum run times. These settings require a thorough understanding of your system’s operation. The Honeywell Home app provides remote access to these advanced settings, allowing for convenient adjustments from anywhere.
Experiment with these options to tailor the T6 Pro to your specific needs and preferences.
Integrating with Smart Home Platforms (Alexa, Google Assistant)
The Honeywell T6 Pro seamlessly integrates with popular smart home ecosystems like Amazon Alexa and Google Assistant, enabling voice control and enhanced automation. To connect, first ensure your T6 Pro is registered and functioning correctly within the Honeywell Home app.
Within the Alexa app, enable the Honeywell Home skill and link your Honeywell Home account. Once linked, you can control the thermostat using voice commands such as “Alexa, set the temperature to 72 degrees.” Similarly, in the Google Home app, add the Honeywell Home service and follow the on-screen instructions to link accounts.
With Google Assistant, you can say “Hey Google, what’s the temperature?” or “Hey Google, turn up the heat.” Integration allows for inclusion in routines, automating temperature adjustments based on time of day, occupancy, or other triggers. Explore the possibilities of creating a truly connected and responsive home environment.
Refer to the Honeywell Home app and the Alexa/Google Assistant documentation for detailed setup instructions and supported commands.
Energy Saving Tips with T6 Pro
Maximize energy efficiency with your Honeywell T6 Pro thermostat through intelligent programming and feature utilization. Leverage the scheduling function to automatically adjust temperatures based on your daily routine, reducing energy consumption when you’re away or asleep. Utilize geofencing, a powerful feature that detects your smartphone’s location and adjusts the thermostat accordingly – lowering temperatures when you leave and raising them upon your return.
Consider utilizing the smart recovery feature, which learns how long it takes to reach your desired temperature, ensuring comfort without wasteful pre-heating or pre-cooling. Regularly review and optimize your schedule based on seasonal changes and occupancy patterns. Ensure proper insulation in your home to minimize heat loss or gain, complementing the thermostat’s efforts.
Take advantage of the Honeywell Home app’s energy reports to track your usage and identify areas for improvement. Small adjustments, like lowering the temperature a few degrees in winter or raising it in summer, can yield significant savings. Regular filter changes also contribute to efficient HVAC operation.
Warranty Information and Support
Your Honeywell T6 Pro thermostat is backed by a comprehensive warranty, safeguarding your investment against manufacturing defects. The standard warranty period is typically one year from the date of purchase, covering parts and labor. Extended warranty options may be available for purchase, providing additional peace of mind. Please retain your proof of purchase, as it is required for all warranty claims.
For technical support and assistance, Honeywell offers a variety of resources. Visit the official Honeywell Home website for a detailed FAQ section, troubleshooting guides, and downloadable manuals. Contact Honeywell’s customer support team via phone or email for personalized assistance with installation, configuration, or any operational issues. Online forums and communities dedicated to Honeywell products can also provide valuable peer-to-peer support.
Warranty claims can be initiated through Honeywell’s website or by contacting customer support. Ensure you have your thermostat’s model number and serial number readily available when submitting a claim. Review the warranty terms and conditions carefully to understand the coverage details and any limitations.
Resources and Further Assistance
Beyond this manual, a wealth of resources exists to aid your Honeywell T6 Pro experience. The official Honeywell Home website (honeywellhome.com) is a central hub, offering detailed product information, FAQs, and downloadable documentation. YouTube channels frequently host instructional videos demonstrating installation and advanced configuration techniques – search “Honeywell T6 Pro installation” for numerous guides.
Online forums and communities dedicated to smart home technology provide a platform for users to share tips, troubleshoot issues, and discuss best practices. HVAC professionals can offer expert assistance with complex installations or system integrations. Honeywell’s support portal provides access to live chat, email support, and a knowledge base.
Consider exploring Honeywell’s compatibility checker to ensure seamless integration with your existing HVAC system. Local HVAC supply stores often carry replacement parts and can offer valuable advice. Remember to register your thermostat on the Honeywell Home website to receive product updates and exclusive offers. Utilizing these resources will maximize your T6 Pro’s potential.
No Responses