
Ingersoll Rand Air Compressor Troubleshooting Guide PDF: An Overview
Ingersoll Rand compressors are vital for many industries; a comprehensive PDF guide assists users in diagnosing and resolving operational issues efficiently and safely.
Understanding Your Compressor Model
Before diving into troubleshooting, identifying your specific Ingersoll Rand air compressor model is crucial. Each model possesses unique characteristics, components, and potential failure points. Locate the model number – typically found on a nameplate affixed to the compressor tank or housing.
This number is key to accessing the correct troubleshooting information within the PDF guide. Ingersoll Rand offers a diverse range of compressors, including reciprocating, rotary screw, and oil-free options. The PDF guide tailored to your model will detail specific diagrams, parts lists, and recommended procedures. Understanding the compressor’s operating principles, such as its pressure settings and duty cycle, will also aid in effective diagnosis and repair.
Locating the Troubleshooting Section in the PDF
Once you’ve downloaded the appropriate PDF manual for your Ingersoll Rand compressor model, navigate to the troubleshooting section. Typically, this is found within the table of contents, often listed as “Troubleshooting,” “Problem Solving,” or “Fault Diagnosis.”
The section is usually organized by symptom – for example, “Low Air Pressure,” “Compressor Won’t Start,” or “Overheating.” Within each symptom category, you’ll find a list of potential causes and corresponding solutions. Many PDFs include detailed diagrams illustrating component locations and disassembly procedures. Utilize the PDF’s search function (Ctrl+F) to quickly locate specific issues or keywords. Familiarize yourself with the PDF’s layout to efficiently access the information needed for effective repair.
Common Ingersoll Rand Air Compressor Problems
Ingersoll Rand compressors frequently experience issues like low pressure, failure to start, and overheating; understanding these common faults is key to effective troubleshooting.
Low Air Pressure Issues

Low air pressure in an Ingersoll Rand compressor significantly impacts performance, hindering tool operation and extending work times. Several factors contribute to this problem, demanding systematic investigation. Insufficient tank pressure often stems from a compressor unable to keep pace with air demand, or a leak reducing overall capacity.
Leaking air lines or fittings are a common culprit, easily identified with a soapy water solution (detailed later). A faulty pressure switch, failing to maintain the correct cut-in/cut-out pressure, can also cause low output. Clogged air filters restrict airflow, reducing efficiency. Regularly inspecting and maintaining these components is crucial for optimal compressor function and consistent air delivery. Addressing these issues promptly restores productivity and prevents further damage.
Insufficient Tank Pressure
Insufficient tank pressure within your Ingersoll Rand compressor indicates the unit struggles to maintain the desired air reserve. This often manifests as tools losing power or the compressor running continuously. A primary cause is the compressor motor’s inability to keep up with air consumption, potentially signaling a worn or failing motor.
Check the motor’s amperage draw against its nameplate rating; deviations suggest internal issues. A malfunctioning check valve prevents air from being retained within the tank. Inspect the pressure switch settings, ensuring they align with the compressor’s specifications. Finally, consider the ambient temperature; extreme heat can reduce compressor efficiency. Thorough diagnosis and timely repair are vital for restoring adequate tank pressure.
Leaking Air Lines or Fittings
Air leaks in lines or fittings significantly reduce Ingersoll Rand compressor efficiency, forcing the motor to work harder and potentially causing premature failure. These leaks manifest as hissing sounds and a noticeable drop in tank pressure, even when the compressor isn’t actively supplying air. Begin by visually inspecting all connections – hoses, fittings, and the pressure gauge – for cracks or looseness.
Tighten any loose fittings, but avoid over-tightening, which can damage threads. Replace cracked or damaged hoses immediately. A soapy water solution, sprayed onto connections, will reveal leaks through bubbling. Regularly inspect and maintain air lines to prevent costly repairs and ensure optimal compressor performance.
Compressor Won’t Start
When an Ingersoll Rand compressor fails to start, systematic troubleshooting is crucial. Initial checks should focus on the electrical supply: verify the power cord is securely plugged in and the circuit breaker hasn’t tripped. Confirm adequate voltage is reaching the compressor. If the electrical supply is sound, investigate the pressure switch, a common point of failure.
A malfunctioning pressure switch may prevent the motor from engaging. Inspect the switch for damage or corrosion and test its continuity with a multimeter. Also, check the overload protector, which may have tripped due to overheating; Addressing these issues will often restore compressor functionality.
Electrical Supply Problems
Diagnosing electrical issues with an Ingersoll Rand compressor begins with verifying the power source. Ensure the power cord is undamaged and firmly connected to both the compressor and a functioning outlet; Check the circuit breaker or fuse box; a tripped breaker or blown fuse is a frequent cause of compressor failure to start. Use a voltage tester to confirm the outlet delivers the correct voltage.
Inspect the compressor’s wiring for loose connections or frayed wires. A faulty capacitor can also prevent the motor from starting, requiring replacement. Always disconnect power before inspecting electrical components for safety.
Pressure Switch Malfunctions
A malfunctioning pressure switch is a common reason an Ingersoll Rand compressor won’t start or runs erratically. This switch regulates air pressure by turning the compressor motor on and off. Test the switch’s continuity using a multimeter; a lack of continuity indicates a faulty switch needing replacement.
Inspect the pressure switch’s adjustment settings; incorrect settings can prevent proper operation. Ensure the air lines connected to the switch aren’t blocked or leaking. Sometimes, cleaning the switch contacts can restore functionality. Always disconnect power before accessing or adjusting the pressure switch for safety.
Overheating Problems
Ingersoll Rand air compressors can overheat, leading to reduced performance and potential damage. Common causes include inadequate ventilation, restricted airflow around the compressor, and insufficient lubrication. Regularly check the compressor’s cooling fan to ensure it’s functioning correctly, removing any obstructions that hinder airflow.

Low oil levels are a significant contributor to overheating; consistently monitor and maintain the correct oil level as specified in your compressor’s manual. Inspect the oil for contamination or degradation, performing oil changes according to the recommended schedule. Overheating can also indicate internal component issues requiring professional attention.
Inadequate Ventilation
Ingersoll Rand compressors generate substantial heat during operation; proper ventilation is crucial for dissipating this heat and preventing overheating. Ensure the compressor is located in a well-ventilated area, free from obstructions that could restrict airflow. Avoid enclosing the compressor in tight spaces or near heat sources.
Regularly inspect the cooling fins for dust and debris buildup, cleaning them thoroughly to maintain optimal heat exchange. Confirm the cooling fan is functioning correctly and isn’t blocked. Poor ventilation forces the compressor to work harder, reducing efficiency and potentially leading to component failure. Prioritize airflow for reliable performance.
Oil Level Issues
Ingersoll Rand compressors rely on proper oil lubrication to minimize friction and wear within the internal components. Regularly check the oil level using the dipstick or sight glass, ensuring it falls within the recommended range specified in your compressor’s manual. Low oil levels can cause increased friction, leading to overheating and potential damage to pistons, cylinders, and bearings.
Conversely, overfilling can create excessive pressure and foaming, reducing lubrication effectiveness. Use the correct type of oil as recommended by Ingersoll Rand; using an incorrect oil can compromise performance. Schedule routine oil changes based on operating hours or manufacturer guidelines to maintain optimal lubrication and compressor longevity.
Detailed Troubleshooting Steps
Ingersoll Rand’s PDF guides detail systematic checks – power, pressure switches, and air leaks – enabling users to pinpoint and rectify compressor malfunctions effectively.
Checking the Power Supply
Before initiating any troubleshooting, ensure the compressor is disconnected from the power source to prevent electrical hazards. Verify the power cord is securely plugged into a functioning outlet, and test the outlet with another device to confirm it’s receiving power.
Inspect the circuit breaker or fuse box associated with the compressor’s circuit; a tripped breaker or blown fuse will interrupt power. Reset the breaker or replace the fuse as needed. Examine the wiring for any visible damage, such as frayed wires or loose connections. If damage is detected, do not attempt repairs yourself – consult a qualified electrician.
Refer to the Ingersoll Rand troubleshooting PDF for specific wiring diagrams and voltage requirements for your compressor model. A multimeter can be used to test voltage at various points in the circuit to identify potential issues.
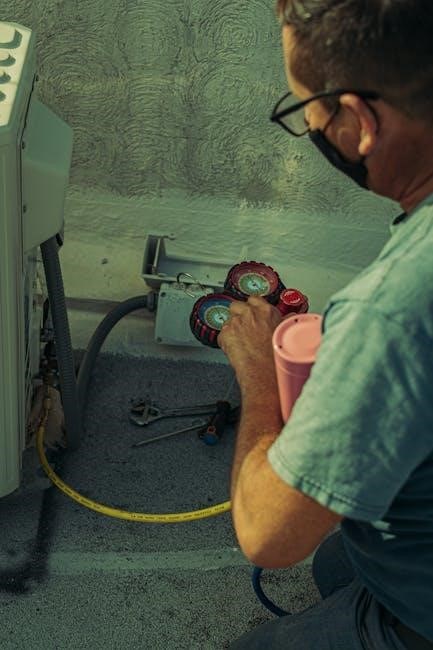
Inspecting the Pressure Switch
The pressure switch controls the compressor’s operation based on tank pressure. First, disconnect power before inspecting. Visually check the switch for any physical damage, like cracks or loose wiring. Use a multimeter to test the switch’s continuity; it should show continuity when the pressure is below the cut-in pressure and no continuity above the cut-out pressure.
Adjusting the pressure switch may be necessary if the compressor isn’t starting or stopping at the correct pressures. Refer to the Ingersoll Rand PDF guide for specific adjustment procedures for your model. Be cautious when adjusting, as incorrect settings can damage the compressor.
A faulty pressure switch often requires replacement. Consult the PDF for part numbers and ensure the replacement switch matches your compressor’s specifications.
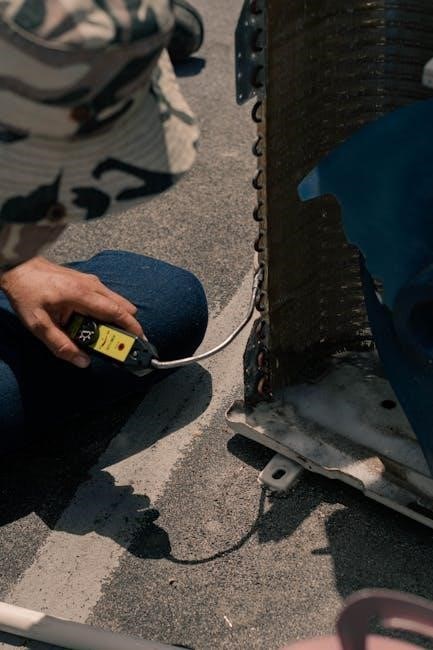
Analyzing Air Leaks
Air leaks significantly reduce compressor efficiency and pressure output. Begin by visually inspecting all air lines, fittings, and connections for obvious damage or looseness. A common method for pinpointing leaks is using a soapy water solution – apply it to suspected areas and watch for bubbles forming, indicating an escape of air.
Common leak points include hose connections, tank welds, pressure switch ports, and drain valves. The Ingersoll Rand PDF guide often details specific areas prone to leaks on different models. Tighten loose fittings, replace damaged hoses, or apply thread sealant where appropriate.
Persistent leaks may require professional attention, especially if originating from the tank itself, as this could indicate a serious structural issue.
Using Soapy Water Solution
The soapy water solution is a simple, effective method for detecting air leaks in your Ingersoll Rand compressor system. Mix a generous amount of liquid dish soap with water in a spray bottle – the solution should be foamy, but not excessively bubbly. Ensure the compressor is pressurized during this test for accurate results.
Spray the soapy solution onto all fittings, connections, hoses, and potential leak points, including the tank welds and drain valve. Carefully observe each area; even small leaks will produce visible bubbles where air is escaping.

This technique is non-destructive and safe for most compressor components, allowing for precise leak identification as detailed in the troubleshooting PDF.
Identifying Common Leak Points
Ingersoll Rand air compressor leaks frequently occur at threaded connections, hose fittings, and the drain valve – these are prime areas to inspect. Check the air tank itself for any signs of corrosion or cracks, particularly around welds, as these can lead to significant air loss.

The pressure switch and safety valve are also common culprits, as their internal seals can degrade over time. Carefully examine the compressor head gasket and cylinder head for leaks, which may require professional attention.
Refer to the troubleshooting PDF for detailed diagrams pinpointing specific leak points on your compressor model, ensuring a thorough and efficient inspection process.
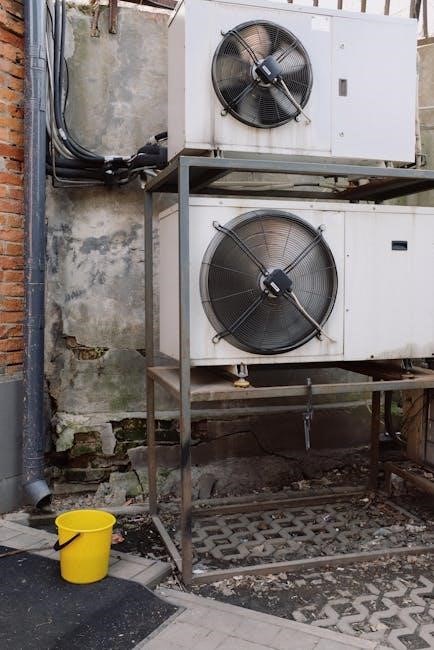
Addressing Overheating
Overheating in Ingersoll Rand compressors often stems from restricted airflow; ensure vents aren’t blocked by debris or obstructions, allowing adequate cooling. Regularly inspect the cooling fan for proper operation – a malfunctioning fan drastically reduces heat dissipation.
Low oil levels are a major contributor to overheating, increasing friction and heat generation. Consult the PDF guide for the correct oil type and level, performing regular oil changes as recommended. Check for oil leaks, which can accelerate depletion.
A faulty thermal overload protector might indicate a deeper issue; the PDF provides guidance on testing and replacing this crucial safety component.
Cooling System Inspection
Thoroughly inspect the compressor’s cooling fins for dirt, dust, and oil buildup, as these significantly impede airflow and heat dissipation. Use a soft brush or compressed air to carefully clean these fins, avoiding damage.
Examine the cooling fan blades for cracks or damage; a compromised fan won’t effectively draw air across the cooling fins. Verify the fan’s mounting is secure and that it spins freely. The PDF guide details proper fan replacement procedures.
Check for any obstructions around the compressor, ensuring sufficient space for ventilation. Restricted airflow is a primary cause of overheating, potentially leading to component failure.
Oil Change Procedures
Regular oil changes are crucial for maintaining compressor health; the PDF guide provides detailed instructions specific to your model. Always disconnect the power supply before commencing any maintenance.
Drain the old oil while the compressor is warm (but not hot) to facilitate complete removal. Locate the drain plug, position a suitable container, and allow sufficient time for full drainage. Dispose of used oil responsibly, adhering to local regulations.
Refill with the manufacturer-recommended oil type and quantity, as specified in the PDF. Overfilling or using incorrect oil can damage the compressor. Verify the oil level using the dipstick and run the compressor briefly to circulate the new oil.

Resources & PDF Access
Ingersoll Rand’s official website offers downloadable PDF manuals and troubleshooting guides; additionally, various third-party resources provide supplemental support and information.
Official Ingersoll Rand Website
Ingersoll Rand’s official website (www.ingersollrand.com) serves as the primary hub for accessing comprehensive resources related to their air compressor products. Users can navigate to the support section and search for their specific compressor model to locate detailed PDF manuals, technical specifications, and troubleshooting guides.
These official documents provide step-by-step instructions, exploded diagrams, and parts lists, enabling users to effectively diagnose and resolve common issues. The website also features a frequently asked questions (FAQ) section and a contact form for direct assistance from Ingersoll Rand’s technical support team. Regularly checking the website ensures access to the latest updates, revisions, and safety information pertaining to your compressor.
Third-Party Troubleshooting Guides
While Ingersoll Rand’s official documentation is paramount, numerous third-party resources offer supplementary troubleshooting assistance for their air compressors. Online forums dedicated to industrial equipment, like those found on Reddit or specialized machinery sites, often host discussions and user-shared solutions to common problems.
YouTube channels featuring experienced mechanics frequently provide visual guides demonstrating repair procedures and diagnostic techniques. However, exercise caution when utilizing these resources; always verify the information’s accuracy and prioritize safety. Cross-reference findings with official Ingersoll Rand documentation to ensure compatibility and avoid potential damage or voiding warranties.
Safety Precautions
Always disconnect the power supply before any maintenance or troubleshooting. Ensure adequate ventilation to prevent overheating and potential hazards during compressor inspection.
Disconnecting Power Before Maintenance
Prior to undertaking any inspection, repair, or maintenance procedures on your Ingersoll Rand air compressor, completely disconnect the power source. This is a non-negotiable safety precaution to prevent accidental startup and potential electrical shock or serious injury. Locate the main power switch or circuit breaker supplying electricity to the compressor and switch it to the ‘off’ position.
Furthermore, if the compressor is connected to a capacitor, ensure it is discharged properly before handling any electrical components. Verify the power is off using a reliable voltage tester. Ignoring this crucial step could lead to severe consequences. Always double-check to confirm power isolation before proceeding with any work on the unit. Safety is paramount when dealing with potentially hazardous machinery;
Proper Ventilation Requirements
Ingersoll Rand air compressors generate significant heat during operation; adequate ventilation is crucial to prevent overheating and maintain optimal performance. Ensure the compressor is located in a well-ventilated area, free from obstructions that could restrict airflow around the unit. Avoid enclosing the compressor in a small, confined space without proper ventilation provisions.
Insufficient airflow can lead to increased operating temperatures, potentially damaging internal components and reducing the compressor’s lifespan. Regularly inspect ventilation pathways for dust, debris, or other blockages. Consider using fans to enhance airflow in particularly warm environments. Maintaining proper ventilation is a key preventative measure outlined in the troubleshooting guide.
No Responses